
How to integrate ColdFusion Application with SharePoint
As Microsoft SharePoint became most ubiquitous corporate online team collaboration and document management tool, most of the CF developers find themselves working in a SharePoint environment and needing to integrate their ColdFusion applications into a SharePoint portal.
Adobe has provided tools to help a ColdFusion developer rise to that challenge since its release of ColdFusion 9 version till the latest 2016 they have been providing several interfaces and tools to handle that.
In this article, I explain how to pull ColdFusion code into a SharePoint page and then how to use the ColdFusion cfsharepoint tag to communicate with the SharePoint Server. This article includes examples of what is possible and touches on integrating Flex into SharePoint.
Understanding the basics of SharePoint
As a ColdFusion developer, you may have had little to no exposure with SharePoint at this point. In this section, we will look at some basics that you will need to know to work in a SharePoint environment.
SharePoint is a content management system application that accesses data stored in a proprietary manner in a MSSQL database. SharePoint’s integrated search services set it apart from just storing files in common folders; it also adds team collaboration context to managing the data files, which are typically generated by Microsoft Office Suite.
An important factor to note is the difference between Windows Sharepoint Services v3.0 (WSS) and Microsoft Office SharePoint Server 2007 (MOSS). A simplistic view is that WSS is a free add-on to Windows Server 2003 or 2008 that allows you to set up “Site Collections” with a more limited feature set, whereas MOSS is a licensed product requiring Client Access Licenses (CALs) per user accessing SharePoint, as well as a server license (check out this link for good feature set comparisons). MOSS has Standard- and Enterprise-level features and can host multiple Site Collections. (This summer, new versions are due to be released, renamed as SharePoint Foundation 2010 and SharePoint Server 2010, respectively.
For this article, we will consider both WSS v3.0 as reference.
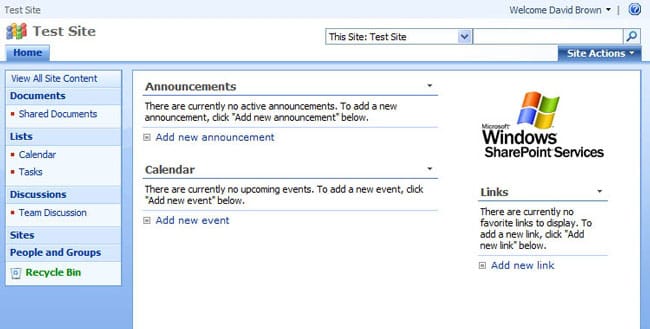
Figure 1. This is what a basic team site looks like in SharePoint MOSS 2007 and WSS v3.
SharePoint site hierarchy and permission-based roles
SharePoint exists as a structured grouping of sites, known as a Site Collection. It is important to understand that site permissions are typically linked with a user’s Active Directory login (this is how Microsoft manages user workstation logins in an enterprise environment). All permissions begin at the top level of the Site collection and propagate down to created sites, inheriting the parent level’s permissions unless you break that default inheritance. So for instance, if I give you a specific set of permissions on the Site Collection, and create a new site, you’ll automatically have the same permissions on a newly created site in that collection. It is important to note that there is no interconnectivity between Site Collections (in a MOSS set up) but there can be connectivity between sites in a single Site Collection.
Some of the key permission levels are:
- Read – Users at this level can only view SharePoint sites and data.
- Contribute – Users at this level can view, add, update, and delete SharePoint sites and data.
- Design – Users at this level can view, add, update, delete, approve, and customize SharePoint sites and data.
- Full Control – Users at this level have full control SharePoint sites and data.
SharePoint Lists: Items and Views
In basic terms, a List is the equivalent of a table in a database and this is most important part or CORE component of SharePoint. SharePoint comes with a number of List templates, such as calendar, task list, and contacts, each of which have their own default columns as one would expect. Yet SharePoint is very customizable. If you need to add fields not already included, such as a customer ID, you can create a column for that list. Even a document library is a list in SharePoint. A document library record includes metadata on the document file and the file itself is stored with the database as a binary large object (BLOB). You can also create custom Lists with no pre-defined columns and then, if choose to do so, save them as templates for future use.
A SharePoint Item is simply a record in a SharePoint List. Each List is referenced by a globally unique identifier (GUID), a 32 character hexadecimal character string. This is important because identifying a List’s GUID is what is necessary to interact with it. Each SharePoint Item has an ID number connected to the GUID of the List it is contained within.
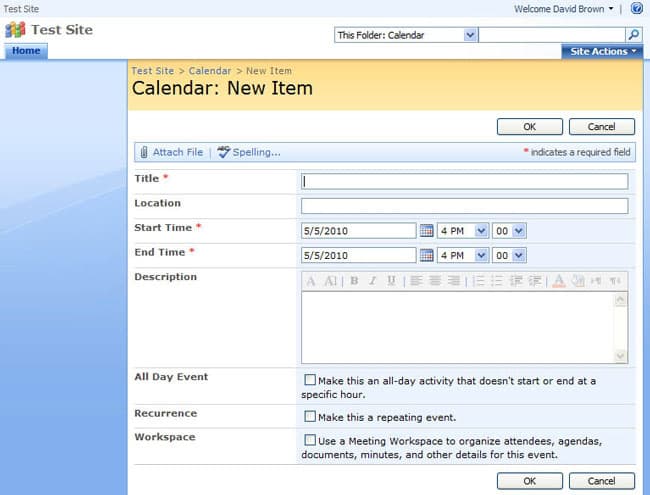
Figure 2. In SharePoint, a generated page for content entry, newform.aspx, for a Calendar List
Each SharePoint List has four default pages generated upon its creation:
- NewForm.aspx – To allow users to add an item to the list in a pre-generated form
- DispForm.aspx – To allow users to review an item in a read-only context
- EditForm.aspx – To allow users with the appropriate permissions to edit a pre-existing item
- AllItems.aspx – To display all the items in a list; a non-filtered view of the list
A final feature of a SharePoint List to note is stored Views. Stored Views are filtered displays of Items within the List that meet a user’s chosen criteria.
SharePoint Pages and Web Parts
When displaying a web page within SharePoint, a typical page will consist of Web Part Zones, pre-defined areas in which you can add a Web Part. A Web Part is a code snippet that displays SharePoint-contained data in a particular layout. An example is a Calendar Web Part that displays Items from a SharePoint Calendar List, giving you options to display content as an event list, or as a calendar showing daily, weekly, or Monthly views. Being able to build a page with multiple Web Parts enables you to design dashboard-type views very quickly.
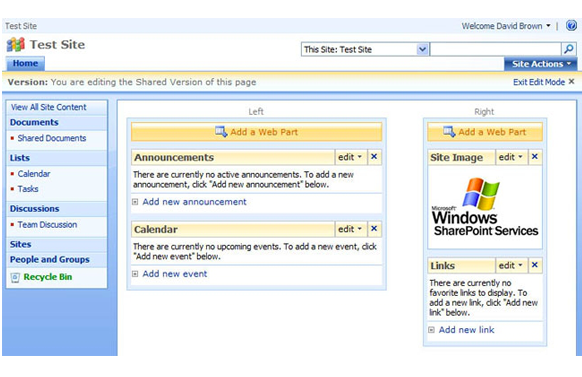
Figure 3. A SharePoint page in edit view, showing the Web Part Zones on a page
Now we will focus on pre-defined Web Part called a Page Viewer Web Part. This is the Web Part designed to pull content external to SharePoint into a SharePoint page.
Using SharePoint Web Parts to display ColdFusion content
As mentioned above, to display ColdFusion content within SharePoint, you start by using a Page Viewer Web Part in SharePoint.
- In SharePoint, select the Edit Page option under the Site Actions Menu in the top right part of the window. (Note: You will only see this menu if you have appropriate permissions, which would be a minimum “Design” level in this case. Ask your Site Administrator if you need your permission levels raised.)
- Once you’ve chosen Edit Page, the page will refresh and display the available Web Part Zones in sectioned groupings. Decide which Zone you want to place your ColdFusion content and click Add a Web Part button in that Zone.
- An Add Web Parts dialog window opens and reveals the available Web Parts in your Web Parts Library. The Page Viewer Web Part is in the Miscellaneous section under All Web Parts header. Select it and select Add.
- Your new Web Part is now in the Zone you selected, displaying the text: “To link to content, open the tool pane and then type a URL in the Link text box.” You can open the tool pane either by clicking the link or by choosing “Modify Shared Web Part” in the Edit menu.
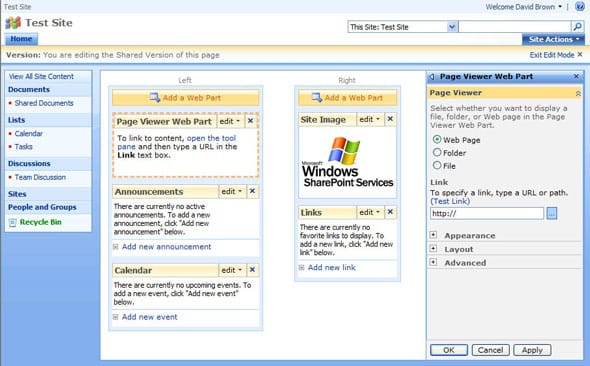
Figure 4. SharePoint page in edit view, showing the Tool Pane for a Page Viewer Web Part. This is where you control the attributes of a Web Part.
- The tool pane opens on the right side of the page. You will see the Link field. Enter your ColdFusion template file (CFML) URL and click Apply.
- As long as your CFML file is on a server or IIS website that is linked to the CFIDE, ColdFusion will generate the HTML appropriately within your SharePoint page. Note that although your ColdFusion application and your SharePoint application can on the be the same box, they do not need to be; it is not required that you connect your SharePoint IIS site with ColdFusion.
- You may need to use the Appearance section of the tool pane to modify the height and width of the Web Part to fully display your content without automatic scroll bars. If your content output is variable, especially in height, you may want to set the area to be larger than you’ll typically need. This leaves white space on the page if the content doesn’t fill it all, but avoids having scrollbars the majority of the time. Remember that the Web Part Zone size determines the width of your Web Part. You can also remove the “Page Viewer Web Part” header from the section by setting the Chrome Type to None. Click OK when you are done and the tool pane will close.
Note that for Adobe Flash and Adobe Flex, you can use a Page Viewer Web Part to display Flash- and/or Flex- generated SWF content just as you did with ColdFusion content within Sharepoint in the steps above. The power to build a Flex application to provide a RIA user interface within SharePoint and using ColdFusion 9 to communicate with your SharePoint data provides a whole new area for Flex developers.
ColdFusion 9 ships with a Single-Sign On Web Part for use within SharePoint that acts a Pager Viewer Web Part but uses the SharePoint login structure to allow your ColdFusion application to reflect the current user’s permission levels when communicating with SharePoint.
Installation instructions for that Web Part are located in the Adobe Documentation for ColdFusion 9: SharePoint Integration section.
Using the cfsharepoint tag in ColdFusion 9
Now we’ve displayed ColdFusion code live in a SharePoint Web Part. The typical reason to do this is to display legacy ColdFusion applications in the context of a new SharePoint environment. What if you want to build a new application using ColdFusion, but have it alter Lists and Items within them in SharePoint? That’s where the cfsharepoint tag comes in.
The cfsharepoint tag is a powerful tag with many attributes that allow you to manipulate SharePoint. First, let’s look at what is required in the tag. On the surface, all you need is the action attribute. This is quite a powerful attribute as by my count there are 49 supported SharePoint actions for the tag. To get SharePoint to do anything, you have to pass some credentials across with the appropriate permission levels. You have two options: 1) Pass the credentials in a structure through the login attribute (such as “domain,password,username“) or 2) Supply those values individually using domain, password, and username values. It’s helpful to store these credentials in your Application.cfc file.
Now that you’ve chosen an action and logged in successfully, you must pass parameters to apply to that action. The attribute params handles that for us. Here is some sample code for creating a generic List:
<cfsharepoint login=”#login#” action=”addlist” params=”#{listname=”testlist” description=”A Test of ColdFusion List creation” templateid=100}#”/>
You can see a full list of SharePoint List IDs here.
Using this ColdFusion code, you’ve created a List. Why would this be beneficial? Well, you could create a user-friendly form that allows typically unauthorized users to create a list with specific parameters put in place. This is an effective way to give users some limited control without opening the floodgates to what some higher-level permissions would allow.
Although it is beyond the scope of this article where I simply wanted to show how to integrate ColdFusion with SharePoint, it might be exciting to see how one could use ColdFusion functions to do what SharePoint cannot do natively. Some ideas are as follows:
- Use the cfimage tag to manipulate SharePoint stored images and then replace them back into SharePoint.
- Use ColdFusion to copy items from a list in one site into a list in another site (or to create a site collection even!).
- Parse a SharePoint list with ColdFusion and output a cfchart in a Web Part.
- Use the cfdocument tag to output PDF files of SharePoint content.
- Use ColdFusion Spry assets to present autosuggest fields.
Where to go from here
Once you have the appropriate permissions within your SharePoint environment, you could experiment and see where ColdFusion can enhance your SharePoint environment. As a ColdFusion developer, you now have the option to create ColdFusion applications within SharePoint in a way you never did before.
Push the envelope, use the ColdFusion (and Flex) RIA concepts in SharePoint and change the offerings. The cfsharepoint tag combined with the Single Sign-On Web Part adds a whole new section to the toolbox for developing in SharePoint. Once such implementation I’ve been able to create is a Flex-based Twitter parser that can check against a list of stored twitter account names or list of topics pertinent to a product or product team.

Figure 5. A sample Sharepoint site running two Flex applications. The first application is a dynamically-generated rotating billboard of SWF files. The second application is a Twitter message parser that pulls a list of twitter accounts and mentions from a SharePoint List.
Of course there are more advanced concepts in using ColdFusion to communicate with SharePoint. For all the methods that have been written into the cfsharepoint tag, there are a multitude of actions that can be done within SharePoint that aren’t directly included. Adobe has solved this by enabling the ability to point directly to the WSDL (Web Services Description Language) for a SharePoint component that you wish to control.