If you’re a developer working with ColdFusion, you’ve probably heard of or used CFEclipse IDE. It’s an open-source ColdFusion Integrated Development Environment (IDE) based on the Eclipse platform that’s designed specifically for your needs.
With its robust features and flexibility, it’s no wonder why it’s become an essential toolkit for many ColdFusion developers.
This article will present and kick you off with utilizing Eclipse and the CFEclipse module as an option IDE (Integrated Development Environment). What’s more, we will quickly cover a couple devices, for example, the ColdFusion 8 Extensions for Eclipse. This is in no way, shape or form a one-stop reference for the CFEclipse module, yet it ought to be an extraordinary beginning stage for anybody new to this condition.
CFEclipse IDE For ColdFusion Development
Eclipse is an open-source IDE. CFEclipse module for Eclipse gives a simple to-utilize ColdFusion viewpoint configured to code in Java with a component rich interface that can be modified with modules and different apparatuses. we will cover some of these elements in this concise article and will likewise show how to set up this program so you can begin working with CFEclipse in only a couple of minutes.
Advantages Of CFEclipse?
Every developer has his or her preference, and Eclipse may not be for you; however, below are few advantages that we think will make CFEclipse to consider.
- Free and open-source.
- Has dictionary view of functions, scopes and tags.
- Enables you to use snippets and use SnipEx servers to share snippets with peers.
- It enables you to create to-do lists that you can track within your code.
- Additional plug-ins such as the Frameworks Explorer.
You can also change the perspective view (explained later) to switch from one coding environment to another.
Latest Features
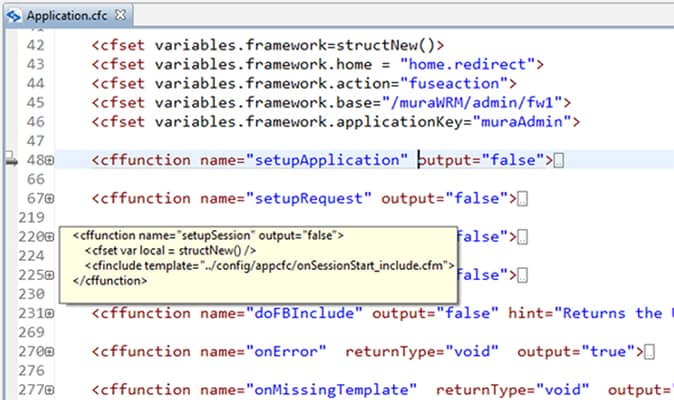
1. Code Folding:
CFEclipse introduced this feature. It is very helpful when working with large files it is often helpful to highlight a section of code and collapse it.
You can find an icon to the left margin allowing you to expand and collapse this section of code as you need it.
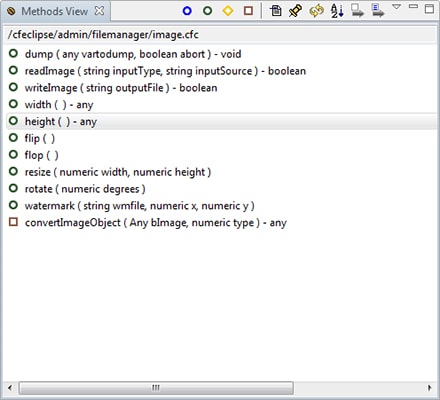
2. Methods View:
Method view will give you the all list of functions with filters and detail explanation.
While working with CFEclipse, open ColdFusion component file and in the methods view – see a summary of the cffunction tags in your document. You can filter your functions based on types of access (remote, public, package and private) and you can sort them alphabetically. Double clicking on a method name will move the cursor to that method in the document and expand the method.
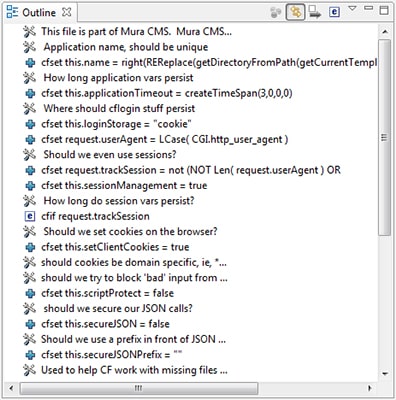
3. Outline View:
This feature is very useful for ColdFusion component files which are made up of cffunction tags. Outline view is designed to have an overview of the structure for CFML files.It will very beneficial when working with large files, you can filter your view based on the type of tag. You can filter on the currently selected element, or on a list of predefined tags such as cfmodule, cfset, cfquery, cfinclude, and cfcase. This makes working with long documents much more manageable.
Installing The CFEclipse Plug-in
Download and install the Eclipse Classic version like in the requirements section provided. Open the Eclipse folder and run the Eclipse executable, eclipse.exe. You will be prompted to choose a workspace location. In this tutorial, we chose to install it at the root of my C:/ drive, and that’s how I will refer to the path throughout this tutorial.
The next step will be to add the CFEclipse plug-in to Eclipse. The easiest way to install CFEclipse is to use the built-in installation and update management tools that come with Eclipse. Use the updater tool will enable you to install and remove different plug-ins without leaving the Eclipse application.
To Install CFEclipse, Use The Following Steps:
- Select Help > Software Updates > Find and install.
- Select Search for new features to install and click Next.
- Click New Remote Site and enter “http://www.cfeclipse.org/update” and click OK.
- You should now have a CFEclipse node in the “Sites to include in search” box select stable CFEclipse and click Next.
- Select the plug-in with the highest version number (the most recent update) and click Next.
- Agree to the license, install the software and restart Eclipse.
Click the perspective button (see Figure 1) and select Other from the dialog box. An Open Perspective window will open. Select CFEclipse from the list and click OK.
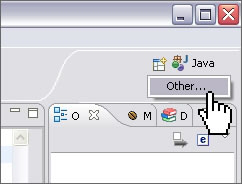
Changing the perspective to CFEclipse
Configuring CFEclipse To Work With ColdFusion
Assuming you already have ColdFusion 8 or earlier installed, be sure ColdFusion is running and you have a site folder in your ColdFusion wwwroot/ folder. This article assumes that you are running ColdFusion locally with the built-in JRun Server. However, if you are not, simply change the path in this tutorial to wherever your ColdFusion applications typically reside within your web root.
1. In CFEclipse, click File > New > Project to open the New Project wizard.
2. Click the plus symbol next to the CFEclipse Folder to expand the contents.
3. Select CFML Project (see Figure 2) and click Next.
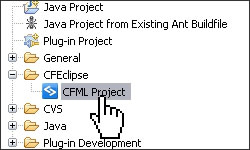
Figure 2. The New Project wizard
4. Give your project a name (see Figure 3).
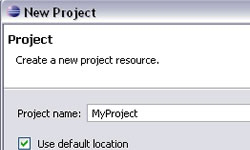
Figure 3. Naming a project.
5. Deselect the “Use default location” option and browse to a location. Browse to the wwwroot/ folder of your ColdFusion 8 server (usually on your C:/ drive) and select your site folder. If you don’t already have a folder in the wwwroot/ folder, you can create one now.
6. Click Next to return to the CFEclipse perspective.
7. Right-click your project and select Select Edit URL from the pop-up menu.
8. Enter the local path of your ColdFusion server (see Figure 4). This is should be your localhost at port 8500, assuming you installed a ColdFusion developer server and used the built-in JRun server: http://localhost:8500/MyProject
9. Click OK.
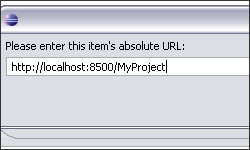
Figure 4. Entering the local path to your ColdFusion server
Testing Your Configuration
To test your configuration, create a CFML page with some sample code to test your set up.
1. Create the page. Right-click your project and select New > CFML Page (see Figure 5).

Figure 5. Selecting CFML page option.
2. Give your page a name; I named mine test.cfm. In the test.cfm page, type <cfoutput>##</cfoutput>.
3. Notice how adding one hash(#) creates two. CFEclipse has code completion capabilities. Although this is a very simple example, you may find CFEclipse finishing your syntax for you. It has great coding tools and reference guides as well.
4. Select the Dictionary view by clicking Window > Show View > Dictionary View (see Figure 6).
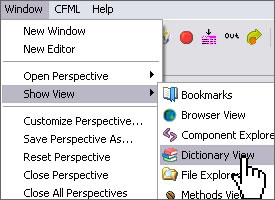
Figure 6. Selecting the Dictionary View
5. In the Dictionary view, Select cf8 from the pop-up list and expand the Functions folder. Scroll down the list to select the Now() function.
6. Click between the two hash marks in your code and double-click the Now() function in the Dictionary view. You will see that the code was added to the page. The hash marks (#) appear around the Now() function so that your code looks like the following:
<cfoutput>#now()#</cfoutput>
7. Save your test.cfm page (Control + S).
8. Select your Browser view tab below your test.cfm page. If it is not already visible, you can click the Show view button to select the Browser View (see Figure 7).
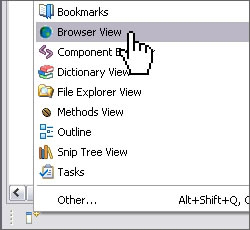
Figure 7. Opening up the Browser View
9. In your Browser View tab, add the test.cfm URL to your site path. Click the Refresh button and a timestamp displays.
If you received an error, check to make sure you do not have any typos in your code, that the URL is correct, that you saved your page, and that ColdFusion is running.
Using The ColdFusion 8 Extensions For Eclipse
To use the ColdFusion 8 Extensions for Eclipse, you will need to download them from the Adobe ColdFusion support site and install them as directed. These extensions include plug-ins that add a ColdFusion 8 code debugger, RDS capabilities, code wizards, and more.
I will very briefly give an overview of the RDS capabilities and the code wizards. I also recommend reading the following article that will give you an in-depth look at the code debugger in Eclipse: Using the ColdFusion 8 step-through debugger for Eclipse.
RDS Capabilities
Remote Development Services, or RDS, enables applications such as Eclipse to browse available components and data structures of data sources on the ColdFusion server. You will be able to access your data sources to view your database tables and to build queries.
Once you have installed the ColdFusion 8 Extensions for Eclipse, you can access these new tools by clicking Window > Show View > Other from the main toolbar. From the window that appears, click the ColdFusion folder to see the options available. From the list, select RDS Dataview and click OK (see Figure 13).

Figure 13. Selecting the RDS Dataview
Now you will see a panel open at the left side of the Eclipse environment. A localhost data source should be visible. If you try to expand the localhost view, you will be prompted for an RDS password. If you configured your ColdFusion server on port 8500, enter your password, and the data sources that are configured in your ColdFusion Administrator will appear. If you have configured your server in another fashion, you will need to open the RDS configuration window by right-clicking the localhost item and Selecting “RDS Configuration.”
From the RDS Configuration window, select your localhost and enter the relevant information to allow Eclipse to connect to your RDS Server that should have been installed and configured when you installed ColdFusion.
When you return to your Eclipse environment, open the tree under the localhost server in the RDS panel. You can expand your data sources to view the tables and columns for each database. You can also build queries off of these data sources.
To view the Query Builder, right-click the data source you want to work with and Select RDS Query Viewer. From here you can write your SQL code by hand or visually, by clicking the Visual Query Builder button on the top of this panel.
From the Visual Query Builder, you can click and click and click to create your SQL queries. There is even a nice visual table relations view to join fields and build WHERE statements (see Figure 14).
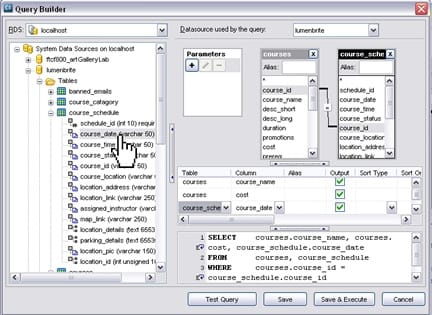
Figure 14. Visual Query Builder
Code Wizards
Several wizards are available with the new ColdFusion 8 Extensions for Eclipse. This article will briefly introduce two of them.
CFC Wizard
The CFC component wizard builds complex CFCs fast and efficiently from your data sources. For example, you can click on a table in a data source from your RDS Dataview panel, then right-click and select ColdFusion Wizards > Create CFC. A CFC wizard opens with editable parameters (see Figure 15).
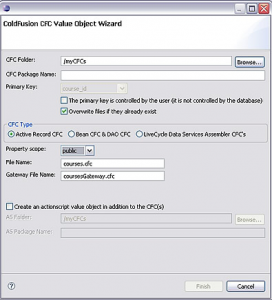
Figure 15. The CFC Wizard
Select your options and click Finish. Your CFC will be created and opened in Eclipse.
ColdFusion/AJAX Application Wizard
The next wizard that I will introduce is the ColdFusion/AJAX Application wizard. There is also a ColdFusion/Flex Application wizard, but it requires the Flex Builder plug-in for Eclipse. This current version of Eclipse that we are using will not work with Flex Builder 2, and you may want to install Flex Builder 3 instead or install an older version of Eclipse that is compatible with Flex Builder 2. The CF/AJAX wizard will step you through building a complete data-driven AJAX application with a few clicks.
To begin, you will need to Select File > New > Project > Other. From the window that opens, select the ColdFusion Wizards folder and open its tree to select the ColdFusion/AJAX Application wizard. A window will appear welcoming you to the power of ColdFusion – yes, indeed…
Select Next a couple of times till you get to the RDS Server and Data Source Selection step. Since this is a new application, it is not necessary to edit any of the default settings in the steps that you skipped through. Refer to the documentation for more details. I have a link below to the relevant Live Docs.
Choose your localhost RDS server and your data source. Click Next again and you will be in the Page Layout and Design step. This section defines the pages that will be a part of your application. You can define Master Pages, Detail Pages, Master Detail Pages and ColdFusion/Flashpaper Report Documents.
In this step you will create a new page from the Available Pages section and add it to the Navigation tree. In the Page Information, name your page and select Master/Detail page (see Figure 16).
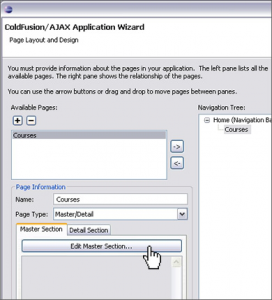
Figure 16. Page Layout and Design step
Click the Edit Master Section button and a Query Builder will open. As this is a master page, only select a few general details, since you will be able to add more columns to the Detail Section.
You will need to select an ID column from the table that you want to work with, even though it doesn’t have to appear in your application. When you are finished building your query, Click OK to close the builder. Back in the Page Layout and Design window, Select the Detail Section tab to reopen the Query Builder.
After you have built your query, click Save and then enter a Project Name and the path to your local ColdFusion server. A folder will be created in your wwwroot folder with the project name that you specify. Do not add a folder name to the end of Web Root Folder. Click Finish and wait for the ColdFusion/AJAX wizard to finish.
That’s it. To browse your new application, Edit the URL of your project to point to your new index.cfm page and click the refresh button in your Browser View tab in the Eclipse environment. Test your new data-driven AJAX application.
If your outcome was not what you desired, you can edit the code, or just create a new project and run the wizard again. For more information about additional wizards and details how to use them, check out the ColdFusion Live Docs documentation.
Additional Reference
For more details about CFEclipse, including a brief history, you can read this overview on CFEclipse for ColdFusion Developers.
We recommend browsing the CFEclipse.org website for updates, how-to videos, and other useful information. A ton of tweaks and add-ons are available for you to use to supercharge your Eclipse environment, but you will need to build the hotrod yourself with available plug-ins.
By leveraging the additional tools that are available for Eclipse and CFEclipse, you can customize your very own feature-rich development environment.
Conclusion
Overall, CFEclipse is an invaluable tool for ColdFusion development. It provides a robust set of features and benefits that make it a great choice for developers looking to streamline their workflow and increase efficiency.
With its easy-to-use user interface, CFEclipse makes it simple to get up and running with ColdFusion development.
Additionally, the built-in troubleshooting capabilities make it easy to identify and address any issues you may encounter along the way.
With CFEclipse, developers have the perfect IDE for all their ColdFusion Development needs.